A nifty feature introduced in iOS 4.0 was Over The Air binary deployments. You can use these to distribute your Ad Hoc beta app without having your users deal with iTunes and mobile provisioning profiles. It’s a great time saver and much friendlier to use than the previous tethered method.
Creating these OTA deployments used to be very tedious. I’ve been learning Rails this past week, and really liked the way Heroku allows you to git push to their servers to deploy. Last night, I wrote up some scripts to simulate this as close as possible. I’ll first go through the basics of OTA deployments, the meaty automation action is at the last section.
Over The Air Deployment Basics
Feel free to skip this section if you’ve been doing OTA deployments already. Automation details are further down the page.
The way this works is through the use of a manifest file and a specially formatted iTunes URL. An example manifest is as follows:
This is a standard ASCII plist — you may use the OS X Property List Editor, or launch your favorite text editor and copy/paste this into a new file. Change the ${###} values to whatever matches your application; use your own Info.plist as a guide for the bundle id, display name and version number, and choose a URL that matches the final public URL where your app will be available to beta testers. For example, you might own the http://google.com domain, so you’d decide to host future betas of the Google +1 iOS apps at http://beta.google.com/plusone/GooglePlusOne.ipa. This must be a directory that is open to the Internet, as your iOS device must be able to download the IPA file.
The manifest and IPA files are linked to from any web page of your own choosing. Just use the following URL format when doing so:
Here’s a full HTML file that you may use if you don’t have a mobile formatted web page just yet:
Just replace the Google +1 dummy data with your own.
Notice the beta_archive.zip link? That’s what we serve to Pre-iOS 4.0 users, since OTA is a 4.0 feature. This is a zip containing the IPA and mobile provision necessary for classic iTunes tethered installs.
Once you’ve done all of this, you don’t need to recreate these files unless the application version number, bundle id or display name change (they must match the values in your Info.plist file).
But Wait… How Do I Create an IPA?
Build and Archive an ad hoc distribution target. Won’t go into details, just make sure to use a development Ad Hoc distribution provisioning profile. I recommend creating a new Target just for these Ad Hoc deployments. This way you don’t have to change the Code Signing settings every time, plus it will allow you to run this build from the command line — the end goal is to automate this process, remember?
Here’s a screen cap from one of my apps:

No code signing entitlements, just a distribution provisioning profile that was created for Ad Hoc deployments in Apple’s iOS Provisioning Portal.
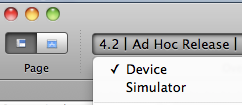
Once that’s set, just make sure your Ad Hoc target is active and then select Device (as opposed to Simulator) from your Xcode drop down:

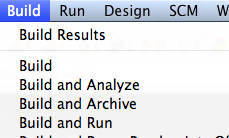
Go to Build and select Build and Archive (if it’s gray, go back to the previous step and SELECT DEVICE, not Simulator):


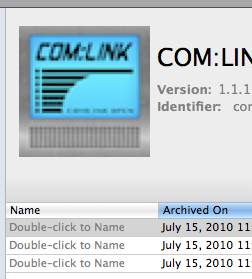
After a couple of minutes, the Xcode Organizer will pop up. Search for your application under Archived Applications, and then select the latest archive. Feel free to assign it a name that is useful to you — in my case, I use the same git tag that was applied to this code before being pushed. Once that’s out of the way, select your archive and then click on Share. Select the same Ad Hoc provisioning profile that you used during the build, then save it to disk. This will generate the IPA file that you need for OTA.
Do I Really Need To Do All Of This Myself?
Well, yes, you need to Build and Archive, but you can then use iOS Beta Builder to create the manifest and HTML files necessary for OTA deployment. Yes, this is what I used to generate the above files. I could have told you initially, but then we wouldn’t learn anything new, would we? iOS Beta Builder is what I’ve been using for OTA deployments since last summer, and it works very well. It will generate all your files, after which you can just zip them up, upload to your website and extract them to their final location.
Enter Testflight
Another option, which I highly recommend, is to use Testflight. These guys have been working hard for months on creating the most painless way to distribute your beta deployments over the air. All you need to do is supply the IPA file, select your team members (use their email addresses) and they will receive a nice, mobile formatted email with the link to your IPA file. The link opens Safari, from where they can click on Install and — well, that’s it! The app is now installed.

Testflight has other nifty features. You may manage multiple teams within each of your application. Say, you have one or two other developers and designers working on your app, you may choose to send them all of the daily builds. You may have another team for the client and just send them the end of week progress builds. And the most important feature, whenever you add a new team member, they get an email where with one or two clicks they can get their UDID registered with Testflight, saving you the need to explain them how to extract it themselves. Testflight also provides a way to batch download all the UDIDs which you can then upload to Apple’s iOS Provisioning Portal and add to your Ad Hoc distribution profile.
Testflight really requires its own standalone review to do it justice. They are in closed beta at the moment (although they opened up their sign up during the holidays!). Wait for them to go public, contact them, or follow them on Twitter to snag your signup next time they open up again. Oh, and being invited to a Testflight team also gives you your own account, so that also works.
Another point goes to Testflight for providing an upload API, which is really useful for — you guessed it — over the air deployment automation.
Alright! Just Tell Me How To Automate All Of This Crap
Well, you need to do two things: automate your Xcode build, and then automate the IPA upload to your web server.
The first part is taken care of by the following script:
Change all the variables to match your own development environment. The end result, if successful, is the IPA file you need and love.
You may now create a simple script that scp’s the IPA to its final location in your web server, alongside the manifest.plist and index.html previously created with iOS Beta Builder. You should be able to do this easily, if not, then Google’s your best friend.
However, thanks to Testflight, you can just call this script once the Xcode build has been successful. It will upload the IPA to Testflight and automatically email your team members.
The team token determines which of your teams, within your Testflight configured apps, receives this deployment.
Since you’re an awesome code monkey, it shouldn’t be too hard to link these two scripts together so that the Archive name and comments are kept consistent with the Testflight notes.
My current deployment set up is an alias that first calls git push, and if successful, calls the build and archive script, which then in turn calls the Testflight deployment script.
Try it out, and let me know if this works out for you.